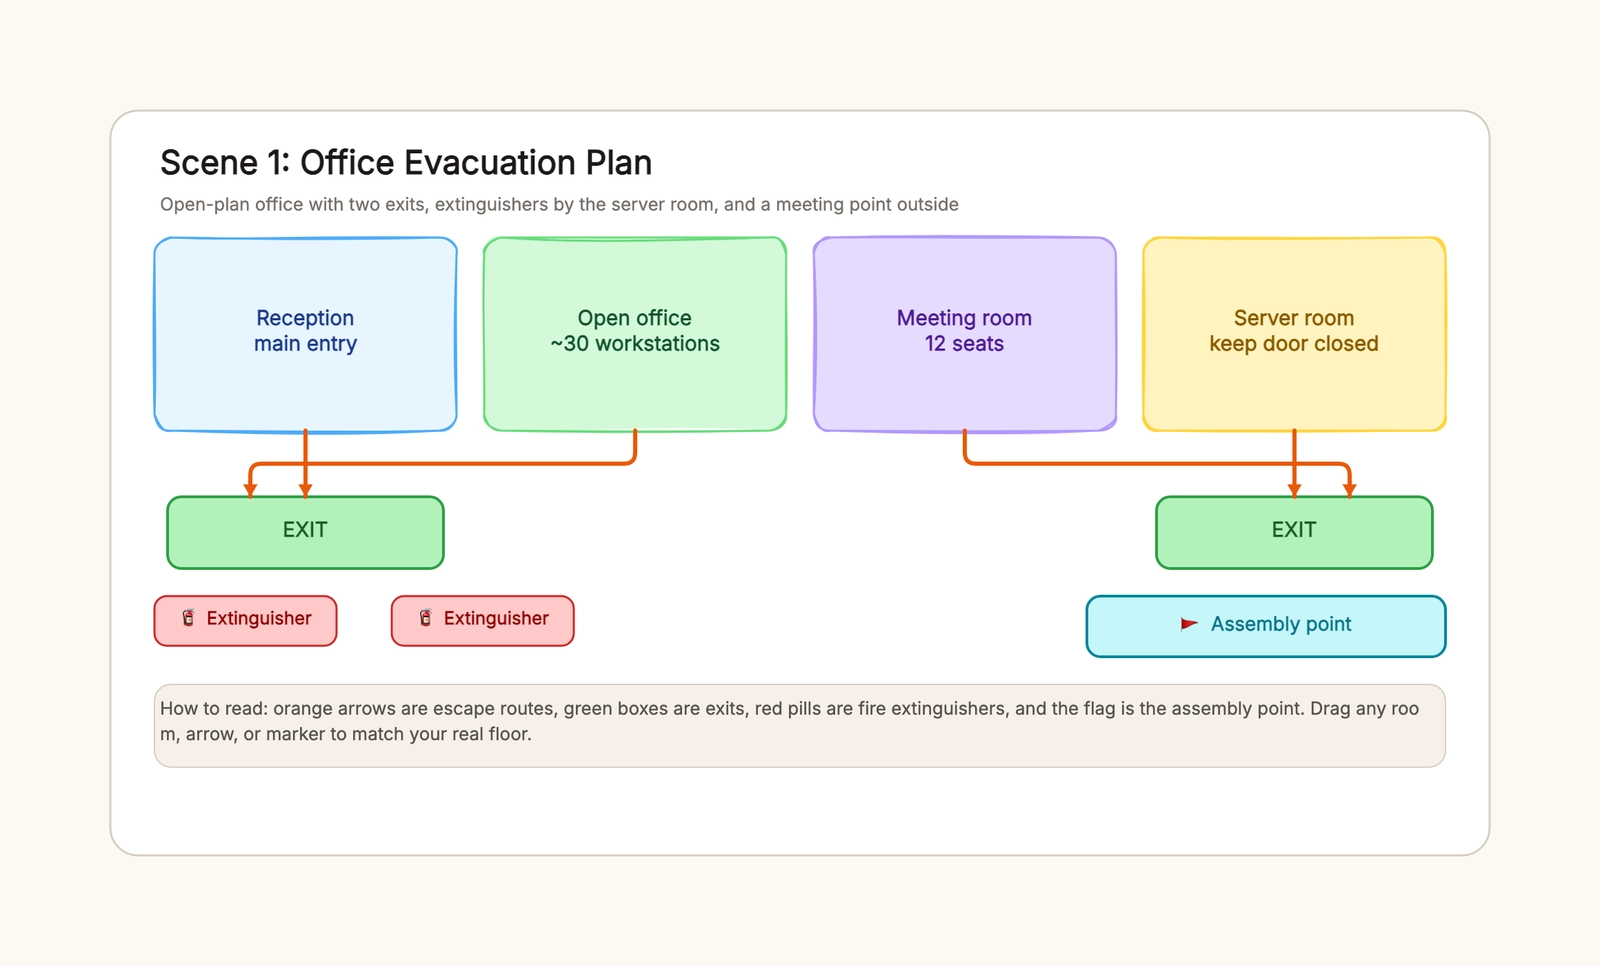
An evacuation map is one visual part of a broader emergency action plan. It should show the viewer's location, primary and alternate routes, usable exits, refuge or assembly areas, alarms, and relevant emergency equipment. The complete plan must also say how an emergency is reported, who can order an evacuation, who assists visitors or people with disabilities, how everyone is accounted for, and who performs any assigned shutdown, rescue, or medical duties.
This guide walks through how to build an evacuation plan from a rough floor sketch, then shows how the same structure changes for an office, a school, and a residential building. You can adapt the evacuation plan template and drag the rooms, arrows, exits, and markers to match your own floor.
What an evacuation plan should achieve
An evacuation plan is not a floor plan with a couple of green boxes added. A floor plan answers "what is in this space." An evacuation plan answers "how does a person leave this space when they are scared and moving fast." That single difference changes what belongs on the page.
A useful plan does five things:
- each occupied area has a primary route and, where the building provides one, a verified alternate route;
- routes follow the building's actual, code-compliant exits and remain unobstructed;
- the map records surveyed alarm and equipment locations instead of inventing placements;
- one assembly point is marked outside, away from the building and the fire engines;
- the map reads at a glance and is supported by training, accountability procedures, and drills.
The mistake most people make is drawing the rooms carefully and treating the escape routes as an afterthought. The routes are the deliverable. Get the rooms roughly right and spend your effort on making every arrow unambiguous.
How to build an evacuation plan
You do not need a CAD tool or a surveyor's drawing to start. A sketch on a whiteboard is enough to find the problems, and those problems are what matter.
1. Sketch the floor first
Draw the rooms, doors, stairwells, and any fixed obstacles. Rough proportions are fine — the goal is to see which rooms have a clear way out and which do not. Start with the exits you already have rather than inventing new ones.
2. Place the exits, then the assembly point
Mark every exit door first, because they decide where the arrows will point. Then mark the assembly point outside — far enough from the building to be safe, out of the path of arriving trucks, and big enough for everyone to be counted.
3. Draw primary and verified alternate routes
Work area by area and trace the primary path to an exit that is actually approved and usable. Where the building provides another safe path, mark it as the alternate. Never draw a route through a locked door, hazardous area, or storage zone; ask the responsible facilities or fire-safety professional to verify exit capacity, accessibility, and direction.
4. Record alarms and emergency equipment
Walk the site and mark alarms, first-aid equipment, and extinguishers that are actually installed. Do not use the diagram to decide extinguisher type or placement: those choices depend on hazard classification, travel distance, local code, and qualified inspection. The written plan must also say whether occupants evacuate immediately or trained, designated employees may use equipment.
5. Add assembly and accountability procedures
Choose an assembly area away from smoke, traffic, falling debris, and emergency access. Define how employees, students, residents, visitors, and contractors will be counted, who reports missing people, and where everyone moves if the first assembly area becomes unsafe.
What the floor map cannot replace
A posted map does not tell people when to shelter in place, how to report an emergency, which alarm signal means what, or who has authority to order an evacuation. Put those decisions in the written emergency action plan, together with assistance for people with disabilities or limited language proficiency, critical-operation shutdown duties, and emergency contacts. Review it whenever the layout, hazards, staffing, or responsibilities change, then run drills that test both primary and alternate routes.
Office evacuation plan example
An open-plan office reads differently from a house because the space is one large zone with a few enclosed rooms. The escape routes still start from each distinct area, but the hazards concentrate around electronics and the server room.
The reception and open office route to verified exits. The map records the server room's installed alarm and equipment markers without assuming occupants should fight a fire. The meeting room receives a primary and alternate path where the real building supports both, and everyone reports to an assembly area that does not obstruct responders.
The office mistake that costs time is a plan where every arrow points to the front door. When that door is the blocked one, the plan is useless. Show both exits and route different zones to different doors, so a single blocked exit never traps the whole floor.
School evacuation plan example
A school is a corridor problem. Classrooms line a central corridor, and the whole building has to empty at once — children moving in groups, staff at the doors, everyone heading outside to be counted.
The plan routes each classroom to the nearest end of the corridor, so the two ends split the flow instead of everyone pushing toward one door. The library and staff room get their own arrows, and the playground is the assembly point because it is open, familiar, and far enough from the road. Class-by-class counts happen there, which is why the point matters more than the exact shape of the building.
Schools also need the plan posted where staff will actually see it — by the classroom door, not in a binder in the office. A plan nobody can see in a hurry is a plan that does not exist when it matters.
Residential evacuation plan example
A residential block is a stairwell problem. The key rule to draw and to repeat is that occupants take the stairwell, never the elevator, and the plan should say so on the page.
Each unit routes to the stairwell, the stairwell is marked as the fire exit, and every floor shows an extinguisher. The assembly point sits outside by the entrance, where residents gather and the warden can count who is out. Unit numbers matter here because visitors and new residents are the ones most likely to not know the way — a plan that names the units helps them match the page to the door they are standing at.
The residential mistake is assuming everyone knows the building. Mark the stairwell and the meeting point so plainly that a first-time guest can follow it in the dark and in a hurry.
Common evacuation plan mistakes
Exits with no escape route
A green box over a door does not tell anyone how to reach it. Every exit needs at least one arrow leading to it, drawn from the rooms that depend on it.
No assembly point
Without a fixed meeting point, people scatter across the street and nobody can be counted. Mark one point, clearly, away from the building and the fire engines.
Extinguishers hidden on the page
An extinguisher helps only if it is both placed and shown. Put the marker next to the risk it serves, and put the real extinguisher there too.
A single, easily blocked exit
Do not draw a second exit that the building does not have. Show every approved exit, identify dead ends during the site survey, keep routes unobstructed, and refer any apparent lack of compliant egress to the building owner and qualified fire-safety authority.
Treating the sketch as a legal document
A schematic is a planning tool. Local fire-safety codes vary, and a plan that has not been checked is a plan you should not rely on. Have the final routes reviewed against your building's real requirements.
Verify the plan with a tabletop walk-through
Before a drill, give several people a printed map and ask them to trace what they would do from different rooms under two conditions: the primary route is open, then it is blocked. Include a visitor and someone responsible for assistance or accountability. Record any ambiguous arrow, inaccessible path, missing person category, alarm question, or assembly conflict and assign an owner to correct it. A fast tabletop review cannot certify compliance, but it catches communication failures before people are moving under pressure.
From sketch to posted sign
An evacuation plan has two lives. The first is the editable sketch, where you move exits and arrows around until the routes make sense. The second is the printed sign by the entrance, fire panel, and classroom door, where it has to read at a glance.
Do the first life on a whiteboard, where moving a room or an arrow costs nothing. Then, once the routes are agreed and checked, freeze it and post it. A plan you iterate on in a meeting and never post is still only a sketch.
Start with the evacuation plan template, replace the rooms and routes with your own, and confirm every room has a way out and a place to be counted. If you are planning a venue or event space rather than a building, the event floor plan template covers entrances, seating, and emergency support for a one-off setup.